Wednesday, April 11, 2012

Oh! the Horror, the Horror!

Unbelievably, I'm not really accident prone. (When I am, however, I do so dramatically.) I fractured my ankle once while dancing (horribly); I cut my arm from wrist to elbow climbing on a lego bucket to get something (I'm very short (5'1")); and once I tried to remove my cat from a precarious position (without her permission) and ended up with a gauzed arm for a week. Still, in my 23 year life-span, three not-really-so-serious accidents deserves bragging rights at least.

So, you can imagine my consternation at being injured while bookbinding (not the most dangerous of hobbies ever). I made a tiny book to put in a tiny bottle, and while the book might have been okay with me stuffing it in, the bottle protested by SHATTERING INTO MY HAND. 

I had several stab wounds, which have mostly healed now without much difficulty. It's lucky the miniature glass bottles came in a two pack. The second much more willingly accepted the little book. Now I can legitimately say my blood, sweat, and tears go into my work (though not literally, because that's just gross). 

Sunday, April 8, 2012

Quote the Raven

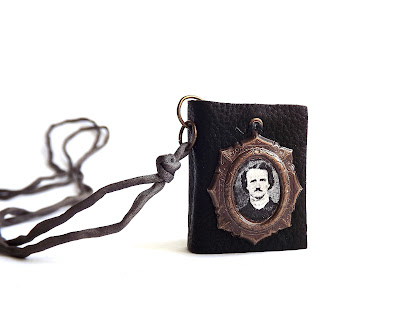
I made an Edgar Allen Poe necklace last night while my sister and I watched Transformers.

I tea stained the portrait and used ModPodge to glue it to the brass frame. The best thing about ModPodge is that it glues clear and can texture the surface so it looks almost painted on.

I hope this little necklace finds a good (if Addam's family-style) home.

This little guy is listed in my shop, here.

Tuesday, April 3, 2012

Mini Book Necklace Tutorial


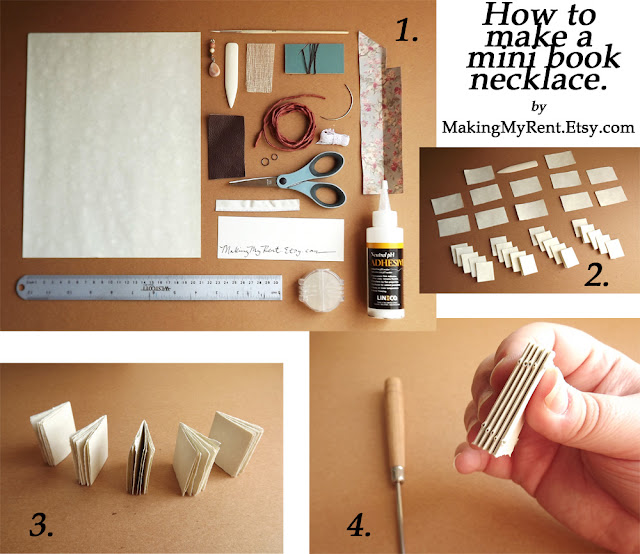
1. To make this mini book necklace gather these supplies: one sheet of paper (I used Wausau stationery), a small paint brush, scissors, super/scrim, PVA glue, linen thread, bees wax, silk head bands, leather, decorative paper, a sewing needle, an awl, two jump rings, a silk cord, a charm, and a short bit of lace.
2. Fold and tear into 16 (5mm tall x 3 1/4mm wide) rectangles, then fold those in half again.
3. Place five of the folios inside each other to form five sections.
4. Punch two holes in each section with an awl.


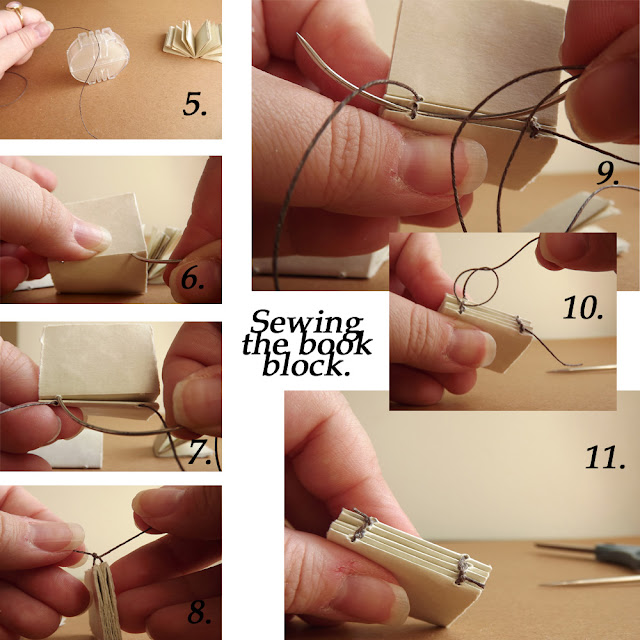
5. Wax your linen thread. (Or buy pre-waxed linen.)
6. Insert the needle into the first hole and out the other.
7. Then put it through the corresponding hole in the second section and through the other hole.
8. Tie the two ends of thread together and insert the needle through the first hole in the third section.
9. Insert the needle between the thread spanning the first and second section. This is called the kettle stitch.
10. Complete the fourth and fifth section in the same way. Finally, tie a knot to finish.
11. Snip off the excess thread ends.


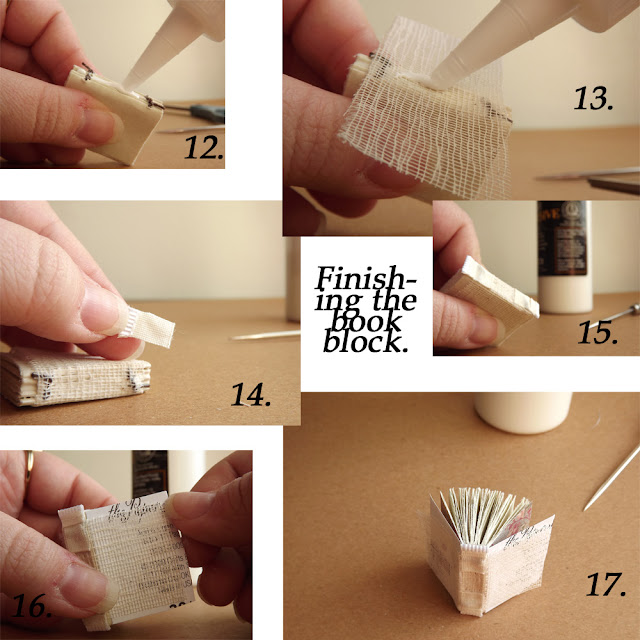
12. Glue up the spine with the PVA glue. Press under a larger book until dry.
13. Attach the super/scrim to the spine with glue. Press with your fingers or brush to make sure it's secure.
14. After letting it dry, cut silk headbands to the appropriate size and glue to the spine.
15. The finished spine will look like this. For extra security, add paper to cover the spine.
16. Glue the endpages with a narrow line of glue next to the crease. Trim if they're too large.
17. Your finished book block will look like this.


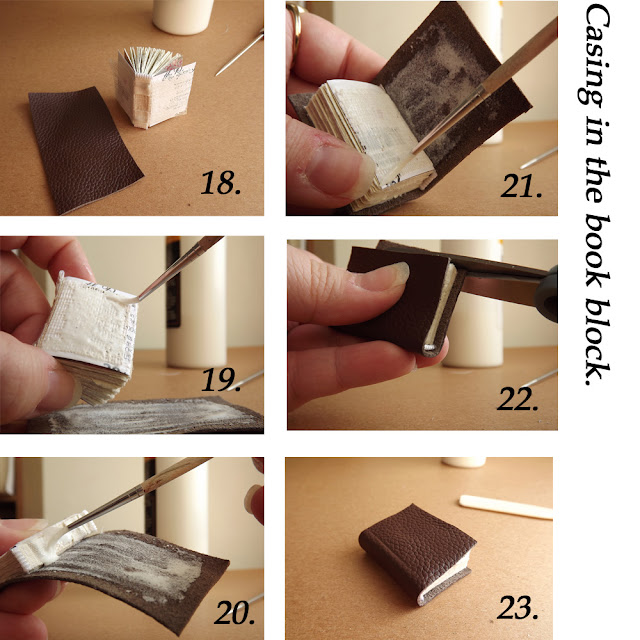
18. Cut the leather to near the size you need. 
19. Spread the glue on both the leather and endpage, making sure that the the holes in the super are filled. 
20. Attach the book block to the leather and glue up the spine. 
21. After pressing the leather to the spine, glue the other endpage to the leather. 
22. Trim excess edges. 
23. Allow to dry beneath your book press. Afterward, you'll make it into a charm.  


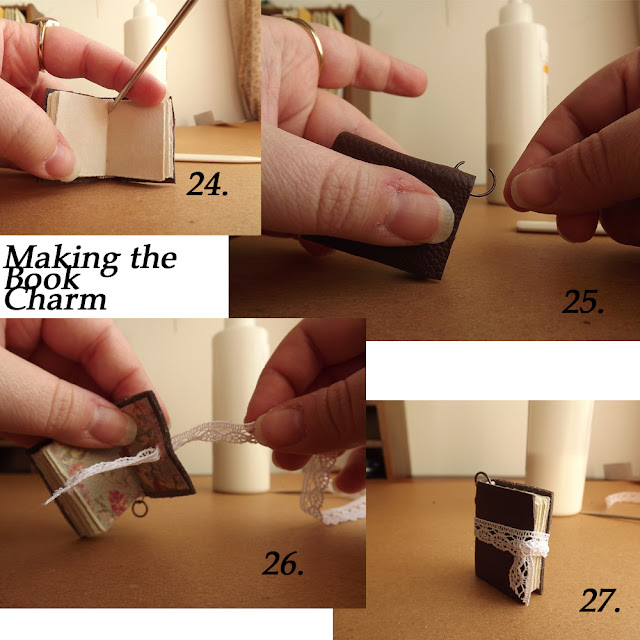
24. Open to a page near the center and punch a hole near the top where you'll place a jump ring.
25. Guide the ring through the hole and close.
26. If you'd like a lace or leather tie, use an exacto knife to cut a line in the front cover. Then, put the tie through and tie.
27. Your book charm is done! Hang it on your cord, and voilà!


This book necklace if for sale in my shop here


Related Posts Plugin for WordPress, Blogger...